
WordPress Post Revisions are a built-in feature that allows you to undo changes and revert to a previous version of a post or page. Revisions are drafts you create that ensure you always have a backup of your work available.
Revisions can build up over time however, take up space in your WordPress database and possibly slow your website down.
In this article we’ll take a look at WordPress Revisions, explain what they are, how to use them and how to manage them.
What Are WordPress Post Revisions?
User Roles and the Ability to see Revisions
How to Restore a WordPress Revision
What is the Difference Between an Autosave and a Revision?
How to Limit WordPress Revisions
Limiting the Number of Revisions Manually
How to Delete WordPress Post Revisions
What Are WordPress Post Revisions?
WordPress automatically saves a post revision every time you save, update or publish a post or page. These revisions are permanently stored in your WordPress database. Revisions make it possible to go back to earlier versions of your posts or pages.
Revisions allow you to view and compare different versions of your content with the current page displayed right next to the previous version. You will be able to compare changes, see who made changes and when they occurred.

The WordPress revisions screen displays content using HTML code which includes information about the blocks used and the page or post layout.
Where to Find Your Revisions
You’ll find your revisions in the “Post” or “Page” section in the settings panel on the right-hand side of the screen when you open a specific post or page in the WordPress editor. Click on “Revisions” to open the post revisions screen.

User Roles and the Ability to see Revisions
The ability to see revisions depends on user roles and permissions.
- Editors and Administrators – can see all post revisions.
- Authors – can only see revisions of their own posts.
- Contributors – only have access to revisions of their drafts.
Comparing Post Revisions
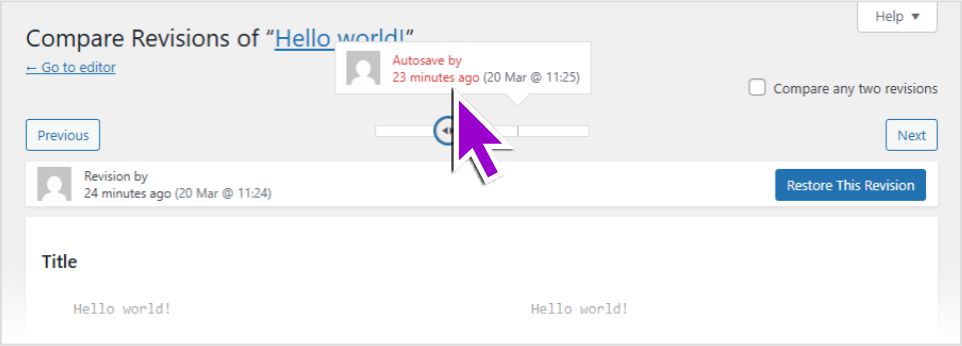
You can compare post revisions in consecutive order with the slider at the top of the revisions screen.

To compare two non-consecutive revisions, click “Compare any two revisions” in the top right-hand corner of the screen. You will then be able to use the slider to select which revisions you want to compare. Changes made in each revision will be highlighted in green and pink. At the top of the screen, you’ll be able to see who made the changes and when they were made.
How to Restore a WordPress Revision
You can restore a revision in WordPress by clicking “Restore This Revision” on the right-hand side of the screen. This will restore the revision in the right-hand column.

You will then be taken back to the post editing screen. You don’t need to click “Update” as the restored version will appear automatically.
What is the Difference Between an Autosave and a Revision?
WordPress does an autosave every 60 seconds by default. The difference between an autosave and a revision is that every autosave automatically replaces the previous one. This means that you will only have the most recent autosave available to restore. An autosave can be restored in the same way as a revision.
How to Limit WordPress Revisions
As I mentioned earlier, WordPress saves a revision every time you save, update or publish a post. The revisions are stored in your database and there is by default no limit to the number of revisions that are stored.
Having a lot of revisions can clutter your database and possibly slow down your website. To prevent this, you can limit the number of revisions manually or with a plugin.
Limiting the Number of Revisions Manually
To limit the number of revisions manually, you will need to edit your wp-config.php file. You can use cPanel or the File Manager in your hosting control panel to access wp-config.php. It will be in the root folder of your WordPress installation which is normally public_html.

Paste the following line of code at the end of the wp-config.php file:-
define( 'WP_POST_REVISIONS', 5 );The number “5” in this example represents the maximum number of revisions that WordPress will store. You can change it to any number you like.
Limit Revisions with a Plugin
If you’re not comfortable with editing code, you can also limit the number of WordPress revisions with a plugin. There are a number of plugins available in the WordPress Plugin Directory that will do the job. I tested “Revisions Control Ultimate” as it had been updated fairly recently. You can find it by searching the Plugin Directory.

After activating the plugin, navigate to Settings > Revision Control to configure the plugin.

Enter the number of revisions you want to keep and click “Save Changes”.

In this example I have limited the number of WordPress post revisions that are stored in the database to 10.
How to Disable Post Revisions
If you’d rather disable post revisions altogether, you can do it by editing the wp-config.php file. Add the following code at the end of wp-config.php:-
define('WP_POST_REVISIONS', false);
This code won’t change the autosave feature and you will still have one revision as a backup.
If you prefer to disable post revisions with a plugin, you could also use the “Revisions Control Ultimate” plugin we used earlier to limit revisions.
By setting the number of revisions to 0 in the plugin configuration you can disable revisions completely.

How to Delete WordPress Post Revisions
WordPress post revisions can be deleted with a plugin or via phpMyAdmin.
Backup Your Website and Database
Before you delete all your WordPress Revisions and make changes to the database, it is advisable to backup your website and database.
There are many backup plugins available for WordPress like All-in-One WP Migration and Duplicator. You’ll find more in the WordPress Plugin Directory.
Delete Old Post Revisions with a Plugin
In this example we’re going to use the “WP-Optimize” plugin to delete old post revisions from the WordPress database.

- The first step is to install the plugin from the WordPress Plugin Directory.
- After installing the plugin, click WP-Optimize in your dashboard and select Database > Optimizations.
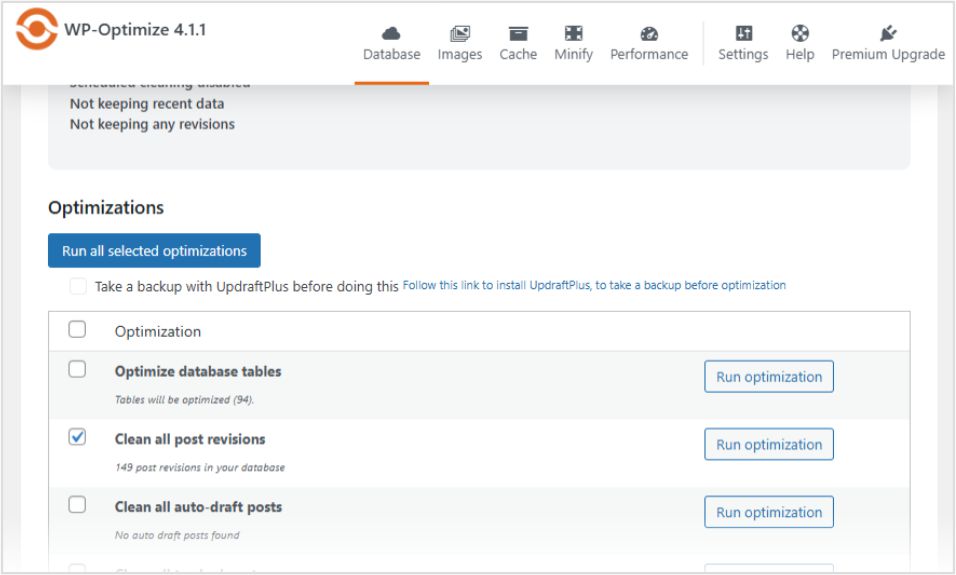
- Check the box next to the “Clean all post revisions” option.
- Click on the “Run optimization” button to delete all post revisions.
- After deleting the revisions, you can uninstall and delete the plugin.
Delete Old Post Revisions Via phpMyAdmin
If you are comfortable working directly on your database and running SQL queries, you can delete old revisions via phpMyAdmin.
- Log in to phpMyAdmin from your hosting control panel.
- Select your WordPress database and click the SQL tab.

Enter the following line in the provided box:-
DELETE FROM wp_posts WHERE post_type="revision";
- Replace
wp_with your own database prefix if necessary. - Click the “Go” button at the bottom to run the command.

This will delete all the old post revisions in your database.
Wrapping Up
Post revisions are a useful feature built in to WordPress that ensures that you always have backups of your posts or pages. The number of revisions however, can build up over time and clutter your database. To prevent this build-up from possibly slowing your website down, you may want to manage your post revisions by doing the following:-
- Limit post revisions
- Disable revisions altogether
- Delete all revisions in your database
Need Help With Your WordPress Website?
Please feel free to contact me if you need help or advice with your website. Visit my home and services pages for more information about me and what I do.

Cimeron Collins
Cimeron is an artist and designer based in Edenvale, South Africa, with over 30 years of experience in the printing and publishing industries.
He’s also an avid WordPress enthusiast who strives to stay up to date with the latest trends in web design and development, constantly exploring new technologies and refining his skills.

Leave a Reply